Studentfood.info

Quick post. My friend while playing with php knocked together this site and seems to have decided to give it some actual traffic.

It is designed in such a way that you input ingredients you have at hand and it will return possible recipes.
As well as being able to read these recipes you can also add your own if you wish.

If you can be bothered be sure to head on over there and give the site a test drive and maybe even add some recipes if you are feeling kind.

http://www.studentfood.info/

Leave a comment »

New Facebook Layout

I think I am right in believing that I am part of a  minority of people, who like it when Facebook change their layout. I have been looking forward to this change since I read about it a couple of weeks ago, and now it has arrived for me today and I cannot help but love it.

This is just going to be a brief description of the new stuff which make a real difference to my use of Facebook. Hopefully I will convert some of you who’s first reaction to the layout was negative. This is certainly not an all encompassing review, so I suggest you take heed of what I have to say then explore for yourself.

The Publisher

It has always been possible to post pictures and links to your wall, but it needed a trip to your profile page to do so. Because I rarely looked at my profile, I was never compelled to post links and lone photos.

The publisher has tried to solve this problem by putting more posting options right on your home screen. It is not bringing anything new to the table, it is merely putting your options in view, so you are more likely to post a wider variety of media.

image

Improved Feed Management

The first difference you may notice is the X in the corner of items in your feed. This is another example of bringing current feature into plain sight. It was previously possible to choose who you did and did not want to see in your feed, but now all you need to do is click the X on people you do not want to hear about anymore.

image

I however have chosen a different method of filtering who I do and do not want to hear about. I have chosen to make two new friend lists (this is done on the Friends page), one list containing people I am interested in hearing about, and another for people I do not want to hear about. This method allows you to view a full feed (All friends), then a feed of interest, and a feed of rubbish.

This is particularly useful if you have an amount of ‘friends’ too large to manage. This method can be extended to include separate feeds for Family, Colleagues and other groups of people, if you are so inclined.

image

News Feed (Full Feed)

image

Interested (Feed of interest to me)

Highlights

image

As far as I can tell, this is replacing the “Top Stories” feed (The previous default feed on the homepage). there is nothing much to say, except that this is the worst new arrival and will be mostly ignored by me.

So hopefully this article has been some use to some people. The new layout will certainly make my Facebook experience much more pleasant. My main hope for the new layout is that people will begin to post more media, rather than solely status updates. And again, I hope I have helped more than I have waffled.

Comments (3) »

Picnik

Hello all. Today all I would like to do is get a few people using this great site to edit their photos, doing my part in the global war against red-eye.

http://www.picnik.com/app

In my opinion this tool is indispensable for people who upload a lot of photos to photo sharing sites, but do not currently edit their pictures. Purely for its sheer ease of use I think this tool should be in many peoples’  tool belts. there are very many features to cover, so I will cover the things which stood out to me.
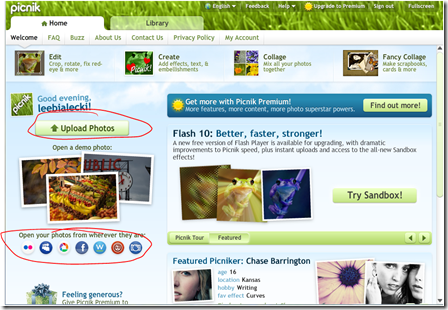
image

To get started first you need to choose a picture to edit. This can either be done by uploading pictures from your hard drive, or accessing pictures you have already uploaded to photo sharing/social networking sites. Here I will be talking about editing pictures on Facebook.
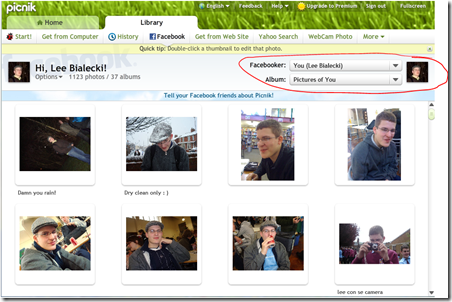
image

When you click on the Facebook icon you will be prompted to log in and you may have to give picnik  permission to access your Facebook information. So once picnik has connected to Facebook you will be presented with your “Pictures of You” album. Now you can use the dropdown menus (circled) to choose who’s photos you want to edit and which album.

image

image


When you have decided which photo to edit, click on the cog icon. You are presented with these options, I will only talk about the editing here, but I’m sure the other options will come in handy some time..


image

Select “Edit” and you can get started. From here it is pretty self explanatory, so now I will just give you an overview of the things which caught my eye.


Rotate

image

Rotating mainly works as it always does. The thing which caught my eye was the ‘Straighten’ tool.   This allows you to break free of the fixed 90° rotations to get awkward pictures as straight as you would like. It is hard to explain this feature so I just say take a look for yourself and all will become clear.

Resize

image

For me, this tool has no real place in photo editing as such. But it is certainly worth a mention because it is the perfect tool to optimize desktop backgrounds to fit your screen resolution perfectly.

Red-eye

image  The red-eye is something I believe should be eradicated from all photo sharing/social networking sites. hopefully any friends (-Peter) reading this will use this site to get rid of red-eye in their Facebook pictures easily. But a notable nice feature of this till is the ability to remove red-eye from both humans and pets.


Create
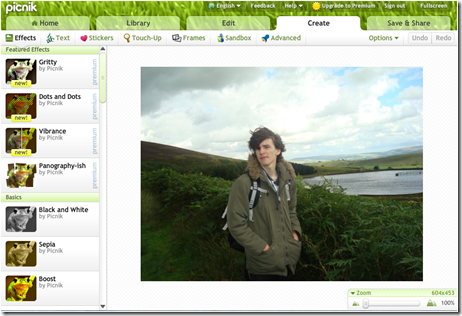
image

There is a whole load of things to do in the “Create” tab which I will not cover, all I will say is that there are many basic effects there which you should take a look at if you are into that kind of thing.

Save and Share

image

And here is what I see as the best bit. Once you have finished editing your photo, you can save it right into Facebook itself. There is no need to save the image, uploaded it and remove the original. You can just replace the old copy with the new copy and you are finished.

I really do recommend this site. With is ease of use, useful features and clean interface, I believe this is the best photo editor for a regular person who uploads a lot of photos.

Leave a comment »

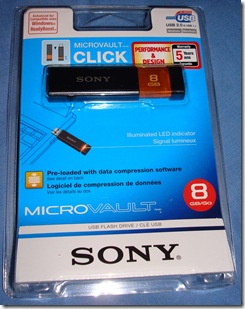
Sony MicroVault Click

DSC07065

After loosing my 4 GB drive months ago, and becoming sick of my 1 GB backup, I went in search of a new flash drive. 8 GB being the smallest I would have liked, also hoping to keep this for many years to come, I did not want to be stuck with an ugly cheap mess. So what I was looking for was 8 to 16 GB, less than £20 and something which looks nice.

A cheap option is the play.com branded range, with 8 GB for £9.49 and 16 GB for £16.99, which is great if you don’t care about looks and don’t want to care about loss. But I settled for Sony’s nice-looking and gimmicky click range. I ended up paying around £20 (with postage) for the 8 GB from Amazon after Play let me down (after more than a week had passed and no dispatch to be seen). So a quick review of it is that its nice looking and reliable. The included compression software could be genuinely useful, it actually does decrease file size, but the software requires administrator privileges. So it is rendered obsolete for college use, how aggravating.

But the glorious gimmicky side of these flash drives is the clicking, it clicks just like a clicky pen, with the USB connector showing and hiding. But it is not just any click, it is the best, most satisfying click known to pen and flash drive alike! When you click it, you really just have to click it again, then again, then again and again.

So all in all it is a quality flash drive, certainly worth the music and I have no regrets after buying it.


DSC07060

Leave a comment »

Tether iPhone to Computer

This is a very simple procedure which is only possible with a Jailbroken iPhone. So if you do not have a Jailbroken iPhone then see my post on how to Jailbreak an iPhone with 2.2.1 firmware (look elsewhere for other firmwares). Before you start I should say the software is nagware (i.e. asks for registration once in a while but registration is not needed)

I will be using a 2.2.1 Jailbroken iPhone and a windows Vista computer, this also works on Mac. So lets get started:

  1. On your iPhone open up Cydia
  2. Search for “Modem” and install “iPhoneModem by Addition”
  3. Download and install  the helper application from http://www.iphonemodem.com/ (Windows or Macintosh)
  4. Open iPhoneModem on your computer and click connect.
  5. On your iPhone go to your wifi settings and connect to “iPhoneModem”
  6. Open up iPhoneModem (just called “Modem” on the list of apps)
  7. Wait for both devices to complete the connection.
  8. Then you should be good to go.

Just so you know this seriously drains battery life, so I suggest you connect your iPhone to your computer with the USB cable to reduce the battery use. And that is it, now you can get the internet on your laptop or netbook wherever you can get the internet on your iPhone (this works great on my Acer Aspire One)

Leave a comment »

Jailbreak iPhone 2.2.1 (QuickPwn)

Ever since the AppStore was introduced I gave up the life of Jailbreaking. Mainly to remove the annoying complexity of upgrading to new firmwares apple released. But I have finally returned to get Modem. The tipping point was when I bought my netbook. I found myself at college wondering why I had not been tethering them since the day I bought them.

So on my week off from college the first task on my list was “Jailbreak iPhone”. The first time I attempted this method I messed it up and had to restore in iTunes. But the second time I was successful and saw it was very easy as long as you followed the instructions well.

If you have force restored your iPhone at any time this method will be familiar. For those who have never Jailbroken and iPhone or iPod Touch, be aware that you may harm your device if you do things wrong, and this is in no way my responsibility. Also be ready to press buttons on your device when the program tells you to.

So lets get started. It looks like there are a lot of steps, but there are only a few and I have just been thorough with my descriptions. I suggest reading all the steps before attempting this so you know what you are getting into and so you can decide weather or not to proceed:

  1. Make sure you are on the latest firmware (2.2.1). If you are unsure of how to check follow the following taps. Settings → General → About. Here you should see “Version: 2.2.1 (5H11)”. If you are not on the latest firmware upgrade using iTunes.
  2. If your device is plugged in then remove it.
  3. Go to http://quickpwn2-2-1.googlecode.com/files/QuickPwn-225-2.zip. This will start the download of the QuickPwn software (kindly developed by the iPhone Dev Team). When the download has finished extract the files and open the QuickPwn.exe file.
  4. Connect your device tot he computer and click the arrow when it turns blue.
  5. Wait for the green tick to appear on the picture of the iPhone then click the arrow.
  6. Here I recommend you keep “Add Cydia” and “Add Installer” checked, it is your choice to change boot logo or not. When you have checked what you want click the blue arrow.
  7. Double check your device is connected. Here is where you need to be ready to use your fingers.
  8. Before you click the arrow to continue hold your device so you have your thumb on the Home button and a finger on the Sleep/Wake button. When you click the arrow you will be given onscreen instructions detailing which buttons to press when and for how long. Be sure to follow the instructions as accurately as you can because it is very easy to get it wrong.
  9. Click the arrow and follow the instructions.
  10. Release the Home button when the green progress bar is full.
  11. If you have done this correctly your device should have a white screen. Then a Green arrow, a hard drive and a message saying “Downloading Jailbreak Data…” will appear on your device. This screen will be shown until the green progress bar on your computer is full.
  12. Finally your device will show a picture of a running pineapple with a blue status bar below it.
  13. Now you can leave your device until the process has finished and you can see the lock screen on your device.

If you mess up with this it is not my fault. Fixes I recommend are then restoring your device in iTunes, force restoring your device, trying the Jailbreak process again and finally look around the internet for a fix. I would be surprised if there is not a solution out there.

So now, supposing you have been successful, your device has two new icons. Cydia and Installer are the applications from which you download the apps now available to you. So go now and play, just be sure to read application descriptions carefully for warnings which may be relevant to you.

Comments (7) »

Installing Windows XP With Flash Drive (Acer Aspire One)

I have recently installed XP on my Aspire One. I followed the tutorial below which worked perfectly. The only thing I had a problem with was creating the bootable Flash Drive using Vista, but I had no issues when I tried again using my XP machine. The The flash drive size has to be at least 1 GB and the whole process should not take you more than an hour.

This tutorial uses an Acer Aspire One as an example but this method is fine to use for any other computer. I will also say that I am not too sure about using this method for different operating systems, so look elsewhere for installing Vista or anything else.

Comments (1) »

Why SMS Should Die

image

I have rather a large dislike for SMS messaging, stemming mainly from my hatred of numeric keypads. But not only is it annoying to write SMS it is more annoying to pay for sending them. So here is a little bit of mathematics for you.

The maximum SMS message size is 160 characters. One character equals 8 bits, one byte. And there are 1,048,576 bytes in 1MB. So 6553.6 SMS = 1MB of data (1,048,576 / 160) Now to say an SMS costs 5p you end up with a cost of 32,768p, £327.68 to send 1MB of data. Now of course I am not saying that this is a situation that the average SMS user will be in.

The point I am making is that if email replaced SMS we would have an infinitely cheaper and richer messaging experience.

On my network (O2) I have an unlimited data plan for £10 a month, so putting that into messaging terms you are getting unlimited messages (containing text, pictures or whatever you want) for £10 a month (compared to 200 text messages). Also if you compare my free broadband service provided by talk talk (FREE with the landline) I can transfer 40GB of data a month, which in SMS cost would cost me around £1.308×10^10 (£13,080,000,000) So what I am really asking is how can they overcharge so much?  I know not everybody has an email capable phone, and everybody has an SMS capable phone, but this is where the change needs to be made.

It is not only a matter of everybody having email capable phones (which most people do, even if they do not realize), the main hurdle is getting people to use email instead of SMS. I see the only way forward is just getting rid of SMS so people are forced to have a much more pleasant experience.

One thing holding us back, is the absence of a cheap, easy to use phone with only the main features you need. Maybe Android (Google’s open source phone operating system) can provide us with something along these lines. Having a few simple features such as Phone, Address Book, Camera and Mail I could see this phone being far from unpopular. Although in this case people may not like paying £10 a month for unlimited data use, so I would say if orange can give us free Facebook they can give us at least 1000 free emails a month.

Update: I just stumbled upon a short article on Gizmodo confirming my point I left out of this post. In Japan SMS is non existant and everyone uses email, so it IS possible. http://i.gizmodo.com/5145203/for-japan-email-is-a-cellphone-phenomenon

Comments (1) »

Changes to iTunes

As some of you may know, 80% of iTunes’ 10,000,000 strong music library is now DRM free, and by the end if this quarter they hope to have a 100% DRM free library.

In addition to removing DRM they have also altered the pricing of their music. Previously there was little escape from the $0.99 price point for a single song. But now music labels can choose to sell their songs for $0.69, $0.99 or $1.29, when these new prices were announced it was also said that many many more songs will be sold at $0.69 than songs sold at $1.29, so most users will either make a saving or at least break even, so you cannot really complain.

Not only is the DRM removed, but the audio is higher quality at 256kbps and you can download music with your iPhone over 3G as well as wifi.

For those of you who have large iTunes-purchased music libraries  you can upgrade previously purchased songs for $0.30, music videos for $0.60 and whole albums for 30% of their price. I imagine this cost would surely mount up to a silly amount if you wanted to upgrade your entire library.

In a battle of digital music sites Amazon used to win by a mile with it’s lack of DRM, higher quality, mp3 format and variable prices. But now iTunes has matched Amazon in DRM and bit rate, so the winner is now decided with your preference. Either you settle for acc and a larger selection, or mp3 and a smaller selection.

Leave a comment »

iPhone Evernote

Evernote is truly the most useful iPhone application I have come across. Long story short it is a note taking device. But it is of course much more than that.

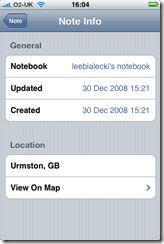
It allows you to make a Text, Photo or Voice note. but again that is not all. It can read text within pictures which is then made searchable, and on top of that it geo-tags all the notes you take on your iPhone so you know where the note was taken.

So, for example here is a perfect situation to use it:

  1. You park your car at the Trafford Centre, you often forget where you parked and spend ages in the cold looking for your car.
  2. Take out your iPhone and open Evernote.
  3. Take a picture of your car or better yet a sign detailing the parking section.
  4. Do your shopping.
  5. Open Evernote.
  6. Open the picture note you created earlier, tap “Details” and “View on Map”
  7. Maps opens and places a pin where your car is.
  8. From there you can make your own way there or even ask Maps for the directions.
  9. You are at your car, happy and warm.

IMG_0004IMG_0008 IMG_0009IMG_0010 IMG_0011

Comments (1) »